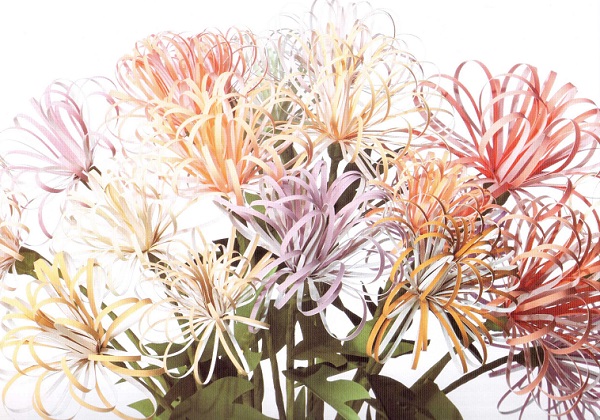
Handmade paper flowers. How to make paper flowers with your own hands: master classes and photos of finished masterpieces. How large paper flowers are used for home decor or photo zone
I continue the theme of designer paper flower crafts, started in. Paper flower is a modern theme of today. You are offered a sample design solution, after looking at it, you can change it and make something of your own - unleash your creativity!
You do not need to have special skills to make the models of flowers that you will see now. Each of you can easily work with a knife, scissors and a glue gun. You just have to learn how to quickly fold the paper, then twist it, bend it and glue it.
As a result, a beautiful hand-made flower will be your reward.
How to make a flower<<Хризантема>> from paper in stages
We create simple and different shades of chrysanthemums from paper - they will be voluminous and beautiful.
Necessary tools and materials:
- Pencil, ruler, needlework knife
- Quilling stick
- Hot glue gun and glue stick
- Colored paper (thin and thick)
- Green leaf paper
- white glue
- Floral wire wrapped in ribbon
- green floral ribbon
Master class with detailed instructions
- For a flower with a diameter of approximately 10.2 cm, you will need a sheet of pale green paper measuring 8.9 x 12.7 cm. You can use paper of any other size, according to the size of the flower.
- On the back of a sheet of paper, use a pencil and a ruler to draw lines, retreating 6 mm from each short side.


3. Using a ruler as a guide, use a knife to make narrow cuts between the two pencil lines.
Tip: Hold the ruler firmly against your work surface, making sure it doesn't slip. It will take time and patience to make the cuts even and neat.
4. The narrower the strips resulting from the cuts, the more elegant and airy the flower will be. And the wider the stripes, the rougher and heavier it will be. In the photo, each strip has a width of 3 mm.


5. Bend the rectangle with the cut strips over your index finger to make a soft curve. If you bend the paper too much, you won't get the gentle bending of the loop-like petals.
Tip: To get a soft curve, you can fold the paper over the body of a flashlight or over the handle of a wooden spoon.
6. Before folding the paper, apply a little white glue to the wrong side of one of the corners of the narrow edge. Do not apply glue along the entire narrow edge strip, otherwise the flower will not fold nicely.


7. Fold and press the two opposite corners of the narrow edges of the paper rectangle and hold them until the glue dries. Remember that you only need to glue one corner, not the entire edge.


8. Starting with the corners glued together, wrap the paper tightly around the pencil or pen. Pay attention to the photo: the pencil protrudes above the paper loops. This is done so that the loops do not get tangled. When winding paper around a pencil, try to even out the loose edges.
We form a flower
9. When all the paper is wrapped around the pencil, fix the edges with a drop of glue and hold them until the glue is completely dry. If you don't let the glue dry, your flower may unfold and the loops may become tangled and out of shape.
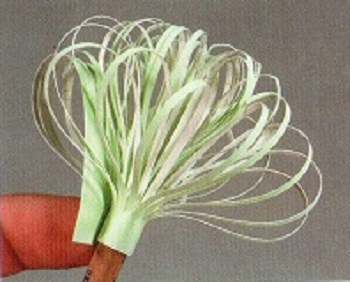

10. Carefully insert your finger into the center of the petals and gently bend them back, giving the shape of a blossoming flower.


11. Use a quilling stick to roll a narrow strip of paper.
12. Insert the twisted strip into the base of the flower, allowing it to unwind slightly and completely cover the pencil hole left after step 8.


13. Squeeze a generous drop of white glue onto the roll inserted into the hole and let the glue dry completely. Insert a piece of floral wire into the roll, which will serve as a stem, after lubricating the end with hot glue.
14. To complete the flower, wrap the stem wire with green floral tape and, if desired, add free-form leaves.
Volumetric paper flower templates - beautiful<<Георгины>>
Here you and I will have to make templates and cuts in certain places. This will take time, but the result will be a reward for patience and effort. Dahlias come in any color, so choose the colors of paper that you like the most to work with.

Tools and materials:
- Forms for cutting different sizes
- Pencil, ruler, scissors or knife
- Paper of different colors, each color of different shades
- Coins of different diameters
- Green leaf paper
- Rigid floral wire
- green floral ribbon
Master class - assembling a flower according to patterns
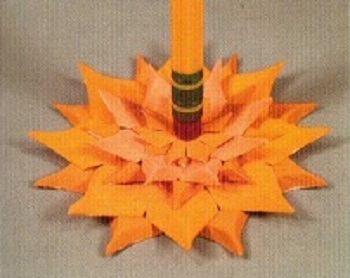
- We make a template (shape) for cutting. 3 templates (forms) will be enough for work: 2.5 cm in diameter, 5.1 cm in diameter and 7.6 cm in diameter.
- Using a cutout cutter, make 2 x 7.6cm circles, 2 x 5.1cm diameter circles, and 2 x 2.5cm circles.
Important note: it is recommended to use 6 circles for one flower, the color of all circles should be the same, only the shades of this color should be different. For example, it can be 6 shades of yellow or 6 shades of lilac. You can use 3 matching colors (or 2 matching colors) as well as the size of the circles (remember that 2 circles of the same size don't have to be the same color).


3. On the reverse side, in the center of each paper circle, draw a circle as shown in the photo.
Tip: To draw a circle, you can use coins of a suitable diameter and circle them with a pencil.
4. Using a ruler and a pencil, divide each circle into 8 identical sectors. Cut the radial lines with scissors. The center circle does not need to be cut.


5. Fold the edges of each sector inward so that you get a regular triangle.
6. To add volume to the petals, turn the circle right side up and pinch the end of each petal across.


7. Fold in pairs circles of the same size as shown in the photo. Fasten them by dropping hot glue into the center. Let the glue dry completely.
8. Glue 3 pairs of circles in the center with hot glue and press with the end of a pencil until the glue dries.

9. From green paper, cut a circle with a diameter of 6.7 cm - this will be a cup of a flower under the petals. Fold it as you did in step 5. but instead of pinching the petals, fold the folds between them as shown in the photo.


flower assembly
10. Lay the flower and cup parts on the work surface as shown in the photo.
Tip: The green paper should be smooth side up and the flower face down. Dab hot glue into the center of the flower.
11. Carefully glue the cup onto the flower as shown in the photo.


12. To make the stem, wrap the wire with floral tape, twist one end of it into a loop and glue it to the base of the flower.
Tip: Raffia-covered florist wire is thicker than regular florist wire and works great with this pattern's stems. You can use wire from a wire hanger to make the stem.
To do this, cut the wire to the desired length with wire cutters, straighten it, and then wrap it with green floral tape before attaching a flower to its end.
13. If you want to add leaves to the flower, cut them out according to the template and attach them to the stem with floral tape.


These are the voluminous dahlias you can make out of paper with your own hands.

Agree that the dahlia model was easy, simple and even interesting for the creative process.
Video on how to make a flower<<Ромашка>> DIY
You have seen how easy and simple it is to make a chamomile, so repeat all the steps and a bouquet of daisies will decorate your interior in the house.
Light paper flowers - beautiful<<Космея>>
Cosmea has a simple and at the same time complex form. Translucent or parchment paper is perfect for this model, thanks to the translucent structure of which the flower will look very delicate.

Cosmos flowers are yellow, orange, red, pink and even white. Therefore, choose the color of the paper yourself.
Tools and materials:
- Form for cutting a circle with a diameter of 5.1 cm
- Scissors
- white glue
- Hot glue gun and glue stick
- Pink translucent paper
- Strips of yellow paper measuring 0.3 x 15.3 cm
- Green translucent paper
- green floral ribbon
Master class with step by step instructions
- Using a cutter, prepare a paper circle with a diameter of 5.1 cm. Fold it in half, then in half again, fold the resulting quarters in half again. With scissors, make cuts between the petals from 6 mm to 1.3 cm long, as shown in the photo.
- Unfold the part and lightly smooth out the wrinkles with your fingers.


3. Bend the edges of the resulting sectors inward, towards each other, to make 8 pointed petals.


4. Turn the flower upside down.
5. Cut off the sharp tips of the petals with scissors.


6. Roll a strip of yellow paper into a spiral. Secure the outer end of the strip with a dab of glue, and then dab the glue into the center of the flower and glue the spiral.


7. To make cosmea flowers look more natural, add half-blown buds. To make a bud, prepare a paper circle as you did in step 1 and fold the sectors with folds towards the center. Tuck the edge of the last petal over the edge of the first.


8. To make the bud half-open, fold it in half, and then straighten it and fold it in half perpendicular to the first bend.
10. Use scissors to cut a narrow triangle in a folded circle, as shown in the photo.


11. Carefully unfold - you should get an eight-pointed star.

12. Glue a green cup under each flower. Hot glue the stem wire to the flower and bend it slightly to give the flower a natural look.
Corrugated paper flowers - video instruction
I hope that the proposed step by step instructions, will help you make beautiful flowers out of paper, and you can surprise your friends with your creativity.
Paper flowers will greatly decorate your interior and bring aesthetics and comfort to your living space. For everyone who wanted to learn how to make paper flowers with their own hands, we will show a few simple tutorials/i>. step by step photo for beginners will demonstrate the whole process in detail, and our tips will help you get the job done quickly and without too much fuss. From our article you will learn how to make a paper tulip, how make voluminous flowers for decorating the interior, how to cut a rose from colored paper and much more.
To cut out all this flower-paper variety, we have selected for you beautiful schemes and templates so that you can complete this task easily and quickly.
DIY paper flowers: a master class with step by step photos
Paper flowers have a number of advantages that you will not find in living plants. Firstly, they do not fade, do not require special care and do not cause allergies. With the help of multi-colored paper flowers, you can advantageous to decorate the interior or clothing, volumetric flowers are attached to the wall or on the door, they are placed in large vases and solemnly presented for the holidays. How to make flowers from candies with your own hands, you can find out in one of our previous articles.
But to make your first paper flowers with your own hands, schemes, templates can be printed on a printer. And then - glue the petals according to the proposed instructions.

Do you dream of being presented with a scarlet flower? Make it yourself! Cut out several templates of different sizes and glue the petals on a special sponge located in the middle of the flower.

And for this purple flower you will need:
- white piece of paper;
- watercolor paints;
- scissors or stationery knife;
- aluminum wire;
- Cork tree;
- paper tape;
- green tape or floral tape.
- Cut a sheet of paper into even strips, not reaching the edge of the sheet.
- Fold the cut leaf into a flower shape.
- Make sheets of paper and fold as in the photo.
- Connect the flower with the leaves and secure with tape.
- Fasten a small piece of cork to the wire and twist it in half.
- Insert the wire into the middle of the flower instead of the stem.
- Wrap the stem with tape and then tape.
- A delicate purple flower is ready.


For a stock, for example, March 8th or May 9th, you can make several origami tulips according to the scheme shown in the photo.

If you have a special stencil, you can make a whole bouquet of scarlet roses and give them to a loved one. Detailed instructions for creating flowers just present in the photo. If there is no stencil, draw the flowers yourself on a sheet of A4 paper yourself.
For other decorative experiments, we offer you a selection of videos for children and adults with detailed instructions on how to make crafts in the form of flowers.
Paper cut flower templates
And in this part of our conversation, we will introduce you paper cut flower templates. The shapes and sizes of flowers for every taste - from the most delicate color of an apple tree to bright blue cornflower and fiery red poppy.


A few more templates will diversify your flower gallery.


Large paper flowers for decorating the hall with your own hands: templates and schemes
Paper flowers are a win-win option for decorating any room.

Note the short but very detailed master class for the production of volumetric paper flowers.

Application from such a "pink heart" decorate the gift box or a greeting card.

Crepe paper flowers are the most beautiful trend of this season. Such giant paper roses can be formed into a chic bouquet, or you can decorate the hall of a restaurant, cafe or your own apartment with them.
It is not difficult to make a flower with your own hands out of paper, especially if you have instruction and manufacturing scheme. Beautiful roses can be made from simple paper templates.
Popular flowers such as carnations can be easy to make from a regular napkin. These delicate flowers will certainly not wither soon.

Scrapbooking is another popular form of creativity for both children and adults. From special colored paper cut simple flowers for cute bouquets or decor.

Easy scrapbooking ideas - try cutting out roses, leaves and petals from special sheets of paper. And then glue everything on a postcard along with bows and decorative ornaments.
Making flowers can get you so engrossed that you don't notice how you transfer your hobbies to other materials, such as fabric. Such cute flowers can make unusual garland or delicate flower basket.

Unique growth flowers will decorate your holiday.
Mk for the production of growth flowers greatly diversifies your creative life. Purchase a special frame in the store, on which a flower of extraordinary beauty will be attached.

paper sakura, like other spring flowers, will give you a gentle and warm mood.
Try to make this flower using the origami technique.

Or cut from a template.
Video: how to make original paper flowers with your own hands
You may like:
- Crochet knitted rugs: interesting models, patterns and ...
Do you want to make an original decoration for your home? They look very nice and are easy to make. They can decorate curtains, they can be put in a vase. Also can be made for wall or table. How to make a paper bouquet is described in the article. Everything you need is usually in every home. Read, choose ideas, try to implement them yourself.
Materials and tools
Do not believe that you can make a beautiful paper bouquet? How to make it? You will be surprised, but material of any quality will do. Even from "waste" you can make a wonderful composition. So, you will need the following:
- newspapers;
- magazines;
- office and design paper;
- corrugated decorative and packaging paper;
- scissors, knife;
- pencil;
- PVA glue or thermal gun;
- wire (preferably floristic green), rods for stem frames, self-adhesive tape for decorating them.
The list depends on the specific type of flowers that you will be making and the execution technology. I would like to pay special attention to such a device as a thermal gun. This is a very handy thing, designed for various decorative and design work. This equipment uses special glue sticks that melt under the influence of temperature. The composition in a viscous form is conveniently applied to any elements and surfaces that immediately stick together.
Bouquets of paper flowers with your own hands how to make? Step-by-step instruction
The technology of each product, of course, has its own, but the principles of operation are similar for everyone. Any composition is created like this:
- Choose your favorite pattern.
- Make blanks of elements on sheets.
- Cut them out.
- Twist, fold, glue parts into flowers.
- Make leaves and stems.
- Collect a bouquet.
- Install and fix it in a vase, pot, if necessary.
General principles are specific to each technology. The methods for making paper bouquets are as follows:
- gluing template blanks;
- quilling;
- origami.
Flowers from layers of carved petals
If you want to learn how to make a paper bouquet quickly, then this method is for you. You can make different flowers: ordinary daisies, gerberas, asters, daffodils and even roses.

The meaning of technology is as follows:
- Draw blanks of petals arranged in a circle, or individual elements.
- Cut out the parts.
- Petals can be slightly twisted with scissors to give them a curved shape.
- Glue the flower.
- Perform leaves, sepals, stems.
- Collect blanks into flowers, and them, in turn, into a bouquet.
Such a composition can consist of three to five elements, or be three-dimensional, including in the form of a ball.
Folded petal flowers
This is another easy way to make a DIY paper bouquet. It is suitable for activities with children. In this case, the flowers are decorative, stylized, similar to daisies.

The technology is like this: 
Origami
If you are mastering this technique of working with material, then you may have already wondered how to make a paper bouquet. For this, modules are used, which are then connected into a flower.

The template and assembly scheme will be the same for everyone. Variety can be obtained by combining elements of different shades. Flowers made using this technique resemble and look very impressive, especially when assembled in the form of a spherical composition. If you turn on the fantasy, you can come up with other options for colors made using the modular origami method.
Roses twisted from a cut circle
This is another option on how to make a paper bouquet with your own hands quickly and easily. The only drawback of the method is that all flowers are the same. Variety can be achieved through the sizes and shades of the manufactured paper flowers.

A circle is used as a source blank. It is cut with scissors in a spiral, moving from the edge to the center. The resulting ribbon is tightly packed in the form of a stylized simplified rose.

The uniformity of all objects can be a plus if you want to collect a geometrically correct composition from them.
Flowers in quilling technique
If you want to learn how to make paper, metallized, special design, study the following technology. Quilling involves twisting elements from stripes. In part, the previous method can also be attributed to this technique. Most often, blanks are made from strips about 5 millimeters wide. In this way, openwork stylized bouquets are made, which are used as decor, as well as for decorating the interior.

- Cut strips of any colored, mother-of-pearl, metallized, textured paper.
- You twist various shapes from them or directly petals, leaves, flower centers.
- Glue the blanks into three-dimensional flowers, fix them on a stalk from a frame wrapped with the same strip or a special self-adhesive tape.
- Collect a bouquet.
corrugated paper
The most realistic do-it-yourself paper flowers from paper can be made from packaging decorative corrugated or crepe material in different shades. The latter is thinner, and the folds in this case are smaller, so the flower will look like a real one. It will take patience.

The elements of the bouquet in this case are folded in two ways:
- A rose can be made from a strip twisted in a spiral.
- Other flowers are made according to patterns. They can be either in the form of individual petals, or several connected together.
In general, the technologies coincide with the work with blanks described above. The difference is only in the material. In addition, you can put sweets inside. Makes a great gift for any holiday. Sweet souvenirs are better to choose a rounded shape in a golden wrapper or pre-wrap them in the appropriate foil. They will be a kind of frame around which the petals wrap.
Realistic for printer
To make a bouquet that looks like a real one, according to the previous example, you will need to buy the appropriate material. There is another way that you can use to make realistic flowers from the comfort of your home. It is suitable if you have printing equipment.
With this method, it is easy to make a bouquet of flowers that have a complex color of petals, such as lilies or irises. They have not only color transitions, but also dots, stripes.

The meaning of the work is as follows:
- You do it yourself on the computer or take ready-made petal templates, on which the corresponding pattern is applied.
- Print out blanks.
- Cut out the petals, and then do everything as in the previous method.
We make from paper
Such an accessory will make the image of the bride very romantic, and will also allow you to keep pleasant memories for a long time, if you leave flowers as a keepsake.

Do you want to know how to make a beautiful bouquet from for this solemn day? The answer is simple: any of the methods described above. There is no specific option, the main thing is to choose a shade, appearance and the shape of a bouquet. It is better if it is made in the form of a ball, in which the flowers themselves and the stems fit snugly against each other.
So, you have learned how to make a paper bouquet in many ways. Any of them can be used both for children's creativity of children of different ages, and as an entertainment and an interesting hobby for adults. By choosing any method, you can easily make nice souvenirs and gifts for relatives and friends.
Need to complement the interior of the house or to please loved ones? Paper flowers will do just fine with this, which can decorate your hearth for a long time and will never fade.
This element of decor can decorate both a banquet table and a living room, it will also be a nice addition to a gift.

Let's look at popular examples of making paper flowers and look at photos of paper flowers.

Coffee filter flowers
For this you will need:
- Colored aluminum wire.
- Paints.
- New coffee filters.
- Pliers.

If there are no coffee filters at hand, corrugated paper in the shape of a circle will come to your aid.
- To create one copy, you need to take about 5-10 filter sheets, depending on how voluminous a paper flower you want to make.
- Gather all the papers and fold them in half a few times.
- The edges of the filter can be wavy cut - this will add similarity to real colors.
- Then, we divide the filters into two halves, those that will be upper - we shorten them by 2-3 cm, so the bud will be more realistic.
- We put all the cut out sheets on the table, so that the smaller ones are on top. We pierce the centers of all filters with wire. We stretch it to half, bend it and pierce the filters again at a distance of 5 mm.
- We fix the wire by twisting it.
- Each "petal" is twisted, squeezed. We do these maneuvers with each sheet.
- To prevent the bud from falling apart, we wrap the base with the remnants of the wire.
- We hide the wire behind the adhesive green tape.
It is not difficult to paint the filters, as they are perfectly saturated with paint. To color the flowers, simply pour any food coloring into the water and dip the bud into it. Your product is ready.

paper rose
Would need:
- Bamboo sticks.
- A thread.
- Corrugated paper (red, pink or yellow).
- Adhesive green tape.

The complexity of this design is to beautifully and neatly wrap the edges of corrugated paper, while straightening the folds, making them even.

We twist the strip so that the tiers are tightly leaning against each other. Then we string the bud on a bamboo stick, fasten it with a thread, wrapping it around.

If desired, wrap the bamboo stick with duct tape. We make several roses from paper to collect a magnificent bouquet.
Asters from old magazines
For this you need:
- Bamboo sticks for decorative items (can be green).
- Glue stick.
- Unnecessary magazines.
- Little scissors.
- Green adhesive tape.

Cut out the brightest and most colorful pages from the magazine. Then we bend them in half, and the halves - to the center. We start cutting the fringe where the folds begin, while leaving 10 mm to the base.

Then we wrap a bamboo stick with the resulting colored strip, and fix the base with adhesive tape. We make the bud voluminous by opening the fringe. Fully wrap the stick with adhesive tape. We repeat the manipulations with each flower.
Corrugated hyacinths
To make this kind of crepe paper flower, you will need:
- Bamboo sticks or skewers.
- Glue stick, hot glue.
- Corrugated paper.
- Food toothpicks.
- Scissors.

We cut several colored strips of paper. We make a border on each strip.

We wind the resulting border on a toothpick, make a kind of serpentine.

We make buds and wrap them on sticks and fasten them with glue. We wrap the “stem” with green adhesive tape, if possible, cut out the sheets and fasten them.
Note!

Calla with your own hands
You will need:
- Double-sided colored paper.
- Stamen (made from polymer clay).
- Wire.
- Hot glue.

We cut out a heart from paper, put a homemade stamen in it. We glue the edges of the heart over the stamen.

We wrap the edges so that the calla is more realistic.

Flowers of this style are suitable for decorating a gift, postcard, and a bouquet of such flowers will delight every girl with its beauty.

paper peonies
For a lush peony you will need:
- Corrugated paper in different colors.
- Scissors.
- Sticks.
- Paperclips.

Stages of work:
Note!

- Cut pieces of paper in different colors. We make an "accordion" out of them. We do this with each color.
- We make it so that each previous strip is 5-6 mm shorter than the next.
- We make the corners of each "accordion" triangular.
- Find the middle of the strip and fold them together.
- With the help of aluminum wire we connect all the "accordions" in the middle.
- Bend the edges to form petals.
- We fasten the buds to the sticks.

paper poppy
You will need:
- Thin corrugated paper.
- Bamboo sticks.
- A thread.
- Green adhesive tape.

Cut into about 10 teardrop-shaped petals. We stretch the folds so that each petal looks like a fungus.

We wind a small amount of paper on bamboo sticks - the core. We fix the main petals on top of the core. We wrap the resulting bud with a thread. We mask the sticks with adhesive tape.

Photo of paper flowers with your own hands


Note!


Publication date: 20.03.2018
Paper is an amazing tool for creating crafts, cards, and even layouts. From it you can create airplanes and even weapons. And today, on the eve of the women's holiday, I wanted to please you with the ideas of paper flowers. I specially selected options with different levels of preparedness, so that both small children could create and adults were inspired to create them.
By the way, such crafts look very interesting as interior decor if they are made in the general color scheme of the apartment design. With pleasure, I made several bouquets with my daughter to give them to their grandmothers. The time spent with the child is reflected in his exclamations “And this is what my mother and I did!” and glowing eyes with enthusiasm.
I invite you to master classes in various techniques. In addition to paper, we will use wire, candy and yarn.
- DIY paper flowers
- Origami flower
- How to make a candy bouquet
DIY paper flowers
I was very inspired by mimosas. They look very realistic, but they are made very quickly, because the buds themselves are pompoms made of yarn, which are quickly made on a fork.
We will need:
- Colored or corrugated paper
- yarn or threads of yellow color. But it’s better to look for yarn, because the buds from it look much more realistic and more fluffy.
- Wire
- fork or scissors
- long sticks

The photo shows how to make a pom pom with scissors, but you can also use a fork, also tying the middle between the second and third prongs.
You need to wind the thread often so that there are no bald spots in the flower.

To prevent the buds from falling under their own weight, we need wire. We fasten it to the middle of one flower.

Now you need to wrap the wire with green paper to get the stem. To do this, we glue the base of the flower with glue or with a glue gun, so we fix the edges.

After one or two scrolls, attach the second bud.

So we do five, six flowers on a branch.

Now you need to make leaves.
A long strip of green paper will need to be wrapped around the skewers. But first you need to make a lot of cuts along the entire length, not reaching the edge of 1 centimeter.
Take a total width of 4 centimeters.

Wind the prepared fringe around the stick, pulling it well.

Here's what happens in the end. I congratulate you, the bouquet for International Women's Day is ready!

I also came across master classes from egg trays. They are also completely made of paper, only they have an already deepened shape.

From the same trays you will get a wonderful flower wreath that can decorate your apartment or cottage.

A cute panel of daffodils looks like the real thing. See how easy it is to repeat all the steps.

The first spring messengers made of paper turned out to be very tender.

The needlewomen have already come up with all the steps for creating such paper beauty for us. We can only repeat.
Schemes and patterns of paper flowers for cutting
To go through the preparatory stage of preparing for the craft, I will give a few popular and most commonly used templates.
You can use them and cut out instead of drawing the leaves yourself, this will save time for busy parents, as well as reduce the waiting time for the child burning with enthusiasm.

For such gerberas, these schemes are suitable.
Each petal is bent along. Templates are superimposed on each other and glued to the center.
And the three middle levels need to be bent with the petals towards you in order to achieve volume.

Another template for creating a fantasy flower.

Popular patterns of daffodil, bellflower and chamomile. 
With these templates, you can create a whole bouquet using paper of different textures and colors.
Master class on how to make voluminous flowers
Making voluminous flowers is not difficult, the main thing is to correctly match the colors and carefully cut out all the contours. Otherwise, it may turn out to be painstaking, but sloppy work.
Unusual hyacinths are obtained with a little imagination.

We take a strip of paper, 5 centimeters wide and 10 centimeters long.
Before reaching the edge, we retreat 1 centimeter and begin to make a fringe 1 centimeter wide.
If you are not sure that you can immediately cut evenly, then first draw lines with a pencil along the ruler.

We bend each strip to the edge. We make a bend only in one direction.

From a strip of green color, 4 * 10 centimeters in size, we turn the tube. Fix the edges and the middle of the product with glue.

Now you need to tightly wrap the flower blank around the tube, laying the base on top of each other.

Prepare the leaves and attach them to the base with glue.

Using different shades, you will create a bright rainbow bouquet.

I present to your attention an interesting craft in the form of a ball, which consists of gerberas.

You will need:
- yellow paper
- coin
- scissors
The picture shows that a saucer was used to create a circle, but you can also take an ordinary compass or any other round object.
We need to make 8 circles of different sizes.
2 circles with a diameter of 10 centimeters, 2 circles with a diameter of 9 centimeters, 2 circles with a diameter of 7 centimeters and 2 circles with a diagonal of 6 centimeters.

Fold the circles in half to determine the middle. Then, using a coin, we form the petals. We connect their edges with the middle. Determine the center of the flower.

We cut the lines of the petals to the center and bend them along the vertical. Glue all the levels and decorate the center of the flower.
Bouquet in a pot - an idea for children
For children, there are unusual ideas when you can not only show your imagination, but also decorate the house.
I propose to make an interesting bouquet in a real planter. You can use any purchased pot, or maybe you already have a used one lying around somewhere.

As a pot, you can take the bottom of a plastic bottle and paint it.
A sheet of green paper should be drawn in stripes, 1 centimeter wide and 8 centimeters long.

Cut them to the line and glue the edges.

We place the finished grass in a pot, after wrapping it with double-sided tape so that the leaves do not come out.

Cut out the buds and cores.

We glue the cores in place and go to complete the craft.

I was also impressed by the daffodils that stood on my grandmother's table during my childhood, only they were made of plastic, but they looked exactly like in the photograph.

Let's start making them. For one flower, we need three levels of petals.
For them, we take squares with a side of 6 centimeters.

We turn them in half twice and cut out the petals, not reaching the center 1 centimeter. There should be four petals.

We lay out the flowers and see if all the buds got the petals.

From a strip of corrugated paper, 2.5 centimeters wide and 16 centimeters long, we make a fringe. The paper stretches easily, be careful.

We turn our core and glue it to the bud.

You can stick ready-made flowers directly on the leaves or form a stem from wire by wrapping it with green paper or ribbon.
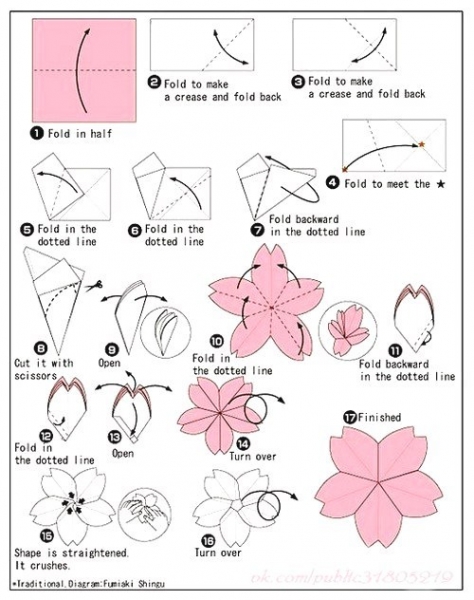
Origami flower
Origami greatly develops logic and motor skills. Of course, small children will not be able to fold the leaf evenly, but for a schoolchild, this is a great activity.
Today we will try to make a tulip. Ready? Then make a square out of a piece of paper and start creating.

The diagram shows detailed instructions for folding the sides.

And this lotus looks incredibly beautiful. And it is also made in the origami technique. Of course, before everything works out, you have to puff, this is not a self-sufficient tulip. There are more petals here.

To create this craft, you need thick paper, such as landscape sheets.

First we make blanks. We need four pieces of white stripes, also take 4 green ones.

According to the indicated principle, you need to roll up all the white and green stripes.

Insert white blanks into each other

Find the middle and stitch it on a typewriter, so you fix all the workpieces in the center.

Now you need to open the petals.

I think that such a decoration will appeal to any girl and even a woman.
How to make a candy bouquet
Very original ideas are made from sweets and corrugated paper. I made from one that is sold everywhere in stationery stores. But, somehow looking through the next master class, I realized that they have a different paper! More dense, it holds its shape better.
So, you can use the most available paper, but it will be better if you take care and get the one that florists use. Believe me, the difference is very noticeable.

We will stick sweets on sticks for kebabs with adhesive tape.

Now you need to prepare blanks for the rose.

Each top must be bent with a stick or a thin rod. It is optimal to use a lollipop handle.

Wrap each candy with prepared petals.
You will achieve greater similarity if, in the place where the candy will be located, stretch the paper a little.

The ends can be tied with a thread or fixed with tape.
The easiest paper crafts
There are always simple and easy options for products. So on my topic, I found just elementary steps for making a paper rose. Absolutely any paper is suitable for its creation, you can even use a newspaper, thus obtaining a very stylish accessory.

So, to the center we cut an uneven line.

And we begin to roll the entire workpiece into a spiral.

Fix the edges and press the middle inward so that the petals straighten out.

Everything is ready, touch up the flower a little and run to decorate the room.

I also bring to your attention interesting tulips.

Each bud is glued together from 4 templates, which were slightly bent in the middle in advance.

We glue the edges, connecting each next template to the middle.

For the rod, you can use terry wire or twist the rod out of paper.

So the seedlings are ready for planting in a pot.

This craft will be much more interesting if you use velvet cardboard or paper of different backgrounds and textures.
Corrugated paper carnations
These flowers look like royalty, and are made in five minutes. Of course, if you collect them in a bouquet, you get a whole gift!

Corrugated paper is very easy to stretch, so often its top edge is pulled up a little in width. So it is easier to wrap inside and itself forms a bud.


My dears, this is not all paper flower ideas, but the article, so, turned out to be quite long. If something is not clear to you in the master classes, then ask questions in the comments, we will understand in more detail.