How to sew a sweater from thin knitwear: a master class plus video. How to sew a sweater according to basic patterns How to sew a knitted pullover
1. Knitted skirt
Warm and knitted skirts are one of the must-haves of this season. A self-respecting fashionista does not have to run around all the boutiques of the city in search of a model that will sit like a glove. We suggest re-wooling your closet stock and making one out of an ordinary sweater.And for such a new thing, you just need: scissors, threads, possibly an elastic band, pins for measurements. Of course, if you skillfully use a sewing machine, and there is one in the house, the process will go much faster. In general - cut off the desired part of the sweater, sweep from the cut side, if necessary, insert an elastic band or a lock. Half an hour and your skirt is ready.
.jpg)
2. Dress: option 1
You can create a very pretty dress from a large size pullover that will not only keep you warm on cold evenings, but also emphasize your slimness. How to sew such a wonderful outfit is shown in the following photo. For even more extravagance, we recommend sewing leather details on the elbows, belt or collar.
3. Dress: option 2
And this version of the dress is suitable even for an important event or New Year's party. It is enough to add a skirt, collar and cuffs made of lace or any other delicate fabric to the sweater. Such bows are in the trend of the autumn-winter 2016-2017 season.
4. Warm hat
Everything ingenious is simple. We take a sweater, cut out two sides along the contours of some sample, sew it together. Warm, cute and bright hat will warm your ears in the most severe cold.
5. Mitts and mittens
You should not spend time on knitting or money on buying mittens that will hide your hands from the first frost. You can easily make them all from the same old friend of ours.
And to replace the mittens, fashionable fingerless mitts made from the sleeves of an old jumper are perfect:

6. New life
Has your favorite sweater gone out of fashion? It's not a problem. How about diluting it with the same lace? Gentle inserts in the neckline and in the cutout on the back will look especially elegant and fashionable. We recommend sewing on the lace by hand.
7. Designer blanket
If you have already accumulated a whole stack of recyclables, then you will get a wonderful original blanket. Woolen sweaters should be dumped. To do this, we place the blanks in a pillowcase in the washing machine for the longest mode and a strong spin. Next, the sweater mode into squares with a side of 26.5 and 15 cm. Sew. It is more convenient and faster to do this with a sewing machine. However, hand sewing with large stitches will add a special flavor to the plaid.
8. Original bag
Designers say that a girl should have as many bags as there are pairs of shoes. Let's add to our collection also . The instruction is simple: cut out the workpiece as in the photo, sew and turn it inside out.
9. Fashionable snood
Prices for trendy snood scarves from well-known brands are sky-high. So the idea of such an accessory with your own hands from an old sweater is to the liking of many. The best thing for our scarf is a knitted copy. We cut off the neck and sleeves, sew the sides, hem the fold with hand stitches and voila - your neck is always warm.
10. Cat bed
In the wild winter cold, not only we freeze. Our pets also want cozy and warm houses to curl up on a cool night. Armed with a pillow, scissors and needles, it is very easy to build a soft bed for your favorite fluffy:
11. Dog suit
In the approach of the New Year, please your dog with a warm new thing. Of course, our idea will not work for large representatives of the canine family, but small four-legged friends will be incredibly grateful to you. To do this, we only need a sleeve, in which we make cuts for the legs.
12. Winter pillowcases
An old sweater will also be a great base for warming your pillows. On buttons, fasteners, one-piece - there is a place for fantasy to roam.
13. Gaiters
Leggings were once used by dancers to warm the ligaments and prevent injury. In the 80s, this piece of clothing came into fashion and remains popular to this day. And from today you don't have to spend money on buying leggings - the sleeves of an old knitted jumper will do an excellent job of this function and will keep your slender legs warm.

Step 1. Shoulder seams
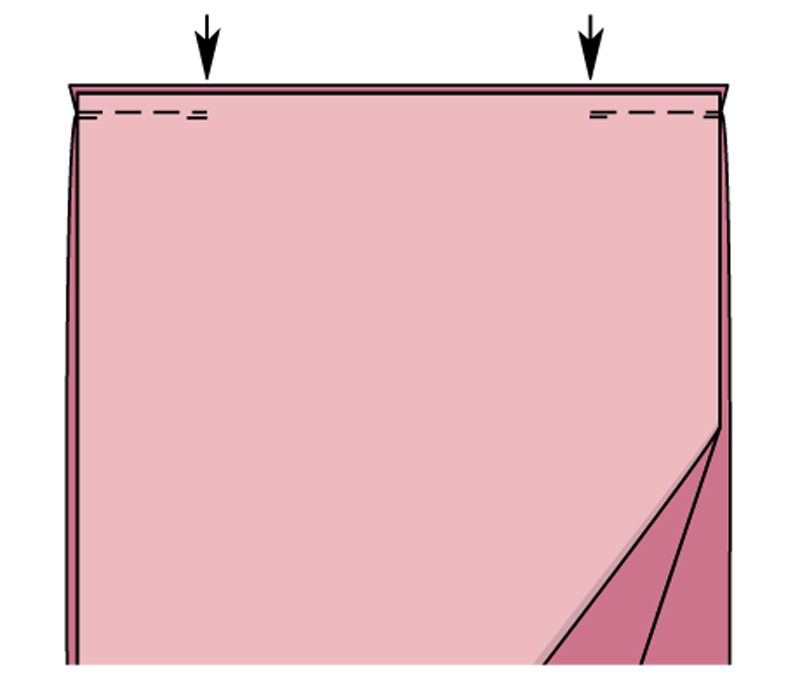
Overcast all sections of the details of the front, back and sleeves. Fold the front with the back with the front sides, exactly aligning the upper edges, chop off (). Run the shoulder seams, leaving a 35 cm long section open in the middle for the neckline (arrow marks). At the beginning and at the end of each seam, perform a backtack. Iron the seam allowances.
Step 2. Side seams

Run the side seams, leaving a 25-26-27 cm long section open on each side at the top for armholes. At the bottom, for all sizes, finish each line, not reaching 31 cm to the lower edge of the back (longer edge). At the beginning and at the end of each seam, perform a backtack. Iron the seam allowances, iron the allowances along the edges of the cuts on the wrong side ().
Step 3 Collar

Fold the collar piece with the front side inward, stitch the sections 39 cm long. Iron the seam allowances. Fold the collar in half with the inside out. Overcast open sections together.
Step 4. Stitch the collar

Stitch the open edges of the collar into the neck with the right side to the front side, aligning the collar seam with the line of the middle of the back. Stitch the collar, interrupting the stitching at the shoulder seams.
Step 5 Sleeves

Fold each sleeve lengthwise in half with the front side inward. Stitch the edges of the sleeve 58 cm long. Iron the seam allowances. Stitch the sleeve into the armhole right side to the right side, matching the seam of the sleeve with the side seam. Sew on the sleeve, starting / ending the line at the side seam.
Step 6. Hemming the bottom, cuts

Spread out the allowances along the edges of the cut. Iron the bottom hem allowances to the wrong side and stitch at a distance of 1.2 cm. Turn the allowances along the edges of the cut back to the wrong side and stitch in the same way, lay the line across the ends of the cuts. Fold the bottom of the sleeves in the same way.
Greetings, dear readers! Everyone loves comfortable and beautiful clothes and today is just such a model. Products in sports style have firmly entered our lives and transformed into pleasant clothes that can be combined with a variety of sets. I bring to your attention a women's knitted pullover. It will fit perfectly into any wardrobe, as it fits the most.
It can be worn with a pencil skirt and with, with and narrow. It can be semi-adjacent and oversized, in the manner of. I am sure that everyone will be able to find a worthy use for it.
In shape, it is very similar to, but thanks to the neck - the boat, it looks more feminine.

It is desirable to use knitted fabrics, but woolen or fleece are possible. If desired, you can use different fabrics for the back, shelves and sleeves. For cuffs and waist, choose only elastic materials.
This model uses a combination of different fabrics.
MATERIAL CONSUMPTION
Knitted fabric in a flower 75 cm with a width of 140 cm
Plain knitted fabric 85 cm with a width of 140 cm
Interlining
BASIC DIMENSIONS
Bust - 100 cm
Waist - 82 cm
Hip circumference - 106 cm
PATTERN DETAILS
1 - Shelf
2 - Back
3 - Sleeve (2 parts)

LAYOUT PLAN ON THE FABRIC
a - a belt 108 long and 12 cm wide (6 cm in finished form)
b - two cuffs 20 cm long and 12 cm wide (6 cm in finished form)
At the seams and along the cuts, it is necessary to give an increase of 1 - 1.5 cm.

SEQUENCE OF WORK
1. Iron a strip of interlining along the entire length of the neckline.
2. Overlock the neck allowances. Iron them on the wrong side and topstitch from the front side from the edge to the width of the foot.
3. Stitch shoulder sections. The edge of the allowance that goes to the neck is sewn by hand.
4. Stitch in the sleeves.
5. Run the side seam and the seam on the sleeve with one line.
6. Sew the short edges of the waistband and cuffs into a circle.
7. Fold the cuffs and waistband in half lengthwise and stitch to the bottom of the sleeves and the bottom of the pullover, stretching to the required length of the bottom sections.
Here is a women's knitwear pullover and it's ready!
Such a model is sewn very quickly. Even a beginner in sewing can handle it. If necessary, you can reduce or increase the pullover pattern. This is done quite simply.
Find out even more interesting things:

Poplin summer dress for girls
Hello dear readers! Many parents like to sew clothes for babies with their own hands, and if you are one of them, then I hope that the proposed model ...

Wolka hood pattern
How many good things in the world happen by chance. For those who are not yet familiar with the new trend in the headwear line, this will be a pleasant...

Oh, those favorite wool sweaters! Sometimes they lie on the shelves for years unnecessarily, and the hostess does not know what to wear to work. You should not rush to throw away old jumpers, half-shirts, because you can make a lot of beautiful and useful things out of them. Real needlewomen manage to make a new sweater from old sweaters. And there are many ideas for reworking these warm products.
What to do with an old sweater
If a large-sized half-dress is lying around in the wardrobe, then you can make a warm dress out of it. There are a lot of pattern options. In addition, it can be decorated with leather details on the collar, elbows, belt. You can also make an elegant dress out of your favorite sweater, you just need to sew a lace skirt on it, add openwork cuffs, a collar.
An ingenious and simple solution would be to make a warm winter hat from a woolen product. To do this, you just need to spread the sweater, attach to it a sample of the hat style you need so that the elastic is at the bottom. Then cut out the two sides of the product and sew.
Sometimes recyclables of different shades accumulate in whole piles. This is another reason to make an original plaid. It's best if these sweaters first get a little wrinkled with a long wash and a strong spin. After drying, square patches are cut out of the sweaters and sewn together. You can alternate squares of different colors, you get a fun mosaic, or you can use calm tones.
All women love to match bags with outfits, so here's a homemade version of old things that is very suitable for daily outfits. It is only necessary to cut a blank in the form of a bag from a sweater, sew it and turn it inside out.
What else can you do with old sweaters with your own hands? How do you like the idea of creating a very fashionable accessory - a snood scarf? Knitwear is best suited for this occasion. The neck and sides, in this case, are cut off, and the sides are sewn together.
Reworking an old sweater can be an excuse to create cute woolen toys. Small animals are easily obtained from the sleeves of products stuffed with cotton wool or padding polyester. It can be bear cubs, squirrels, bunnies and even octopuses.

New sweater from old sweaters
If you arm yourself with scissors, a sewing machine, needles and accessories, you can breathe new life into old things. How do you like the idea - to make a new sweater from old sweaters? Such a fashionable alteration can be done by crossing a sweater with a blouse. The result is a stylish, extraordinary product. You can refresh any sweater by sewing it under an elastic band, lace or an insert made of thin fabric.
Another option is to cross the details of the old jumper and shirt. For example, cut the sleeves and sides from a jumper, and take the front and back from a shirt. Shirt cuffs can also be sewn to the sleeves. It turns out to be a very cute thing. This is how a new sweater is made from old sweaters.

Covers for pillows and tablets
The back and front of the sweater are perfect for making woolen pillow covers that will decorate a bed or sofa. To do this, you need to find out the dimensions of the pillow, cut out two identical squares or rectangles on them. Then they need to be sewn from the wrong side, leaving a hidden hole. Then the cover must be turned out and put on the pillow. Such a warm pillowcase will especially please its owners in the winter.
Not only the pillow can be enclosed in an original cover, a smartphone, tablet and glasses are also suitable for this. It is performed in the same way as for a pillow, only it is sewn on three sides. Similarly, you can sew cases for vases and candlesticks.

Pots for indoor plants
Any woolen product will help turn a flower pot into a decorative thing. To do this, you will need a piece of an old sweater, threads, a needle and glue. Then the original envelope is sewn together, in which crocuses, violets, hyacinths can show off.
An old sweater can be cut into strips, then tied with knots. Here's an original hanging planter for the veranda!
Skirts, mittens, socks
In the fashion of recent seasons, warm knitted skirts. Fashionistas do not have to buy a new one, you can safely make a new thing from an old sweater. To do this, cut off the bottom of the sweater with an elastic band of the desired length. Then the cut side is swept up and an elastic band is inserted to fix it. Only half an hour takes such a product.
Mittens and mitts for frost are also not necessary to buy. Quite fashionable fingerless mitts will come out of the sleeves of an old jumper. And according to the pattern, you can very easily sew warm mittens or socks.

It is not easy for beginners, you need to include patience and attention. It is quite possible to complete such a product in 5-6 evenings. What is suitable for beginner knitters? It is best for the first time to take semi-woolen threads with acrylic, medium density. They will lie flat, not weigh down the model and not fall off. On average, a sweater will need 600-700 g of yarn, depending on the size.
The easiest way to learn how to knit a sweater for beginners from below is raglan. To begin with, 140 loops are typed on circular knitting needles (for size 44-46). Then about 40 cm is knitted with the desired pattern, the product is laid aside. On separate stocking needles, sleeves are knitted separately to the desired length. Further, the sleeves and the lower part are connected, and the raglan is knitted from below. The decrease of loops is performed in four places, two loops through the row. Raglan should be approximately 20 cm. The remaining loops are knitted with a garter stitch, which tends to twist into a roll. Get a kind of neck. Here is a classic version that will look quite impressive!
For such a sweater for autumn, it is good to take thin but warm knitwear, for example, woolen or with the addition of wool. Building a pattern is simple: a sweater or jumper made of a similar material fits well on you (do not take a knitted jumper that is too thick: thick knitwear sits differently). Sewing such a sweater is also easy. If there is no overlock, you can also sew it on a sewing machine (read about different ways of sewing knitwear on a machine here).
You will need:
Knitwear;
Sewing machine or overlock and thread;
Paper, pencil and ruler for building a pattern;
Scissors - tailor's and for paper;
Suitable sweater for pattern.
Step 1


Fold the sweater in half, place it on paper and trace around.
Step 2

From the armhole down, measure about 20 cm - this will be the waist line. Next, extend the sweater to the length you need (here - 50 cm). From the waist line, set aside the distance to the hip line (19-21 cm) and put a mark.
Step 3

Measure the circumference of your hips. Divide this value by 4 and set aside this distance to the right of the middle of the pattern along the hip line. Add 3-5 cm to the freedom of the fit.
Step 4

Draw a line from the armhole to the bottom point.
Step 5

Place the folded sweater back on the paper. Straighten your sleeve. Measure 5 cm down the sleeve seam. Mark a right angle across the sleeve and make a dot.
Step 6

Draw a straight line from the top of the shoulder line, from the bottom - a straight line connecting the armhole and the point set at the seam of the sleeve, and round the corner from below.
Step 7

Put the sweater on the pattern again and measure with a centimeter how much sleeve length is missing from the constructed pattern. In this case, 40 cm.
Step 8

Building the sleeve: draw a rectangle with a length of 40 cm (the value from Step 7) and a width equal to the width of the constructed part of the sleeve (see Step 6). To narrow the sleeve a little, on one of the narrow sides of the rectangle we measure 3-4 cm from the edge and draw a new line.
Step 9
Cut out patterns from paper and cut out details from knitwear: front, back and 2 sleeve details.
Step 10

Fold the front and back pieces face in and sew the shoulder seams.
Step 11

Now you need to sew on the sleeves. Unfold sleeve piece and sewn front and back, fold right sides inward and sew. Repeat with the second sleeve.
Step 12

Turn the sweater inside out, fold evenly and sew the side seams, sewing the sleeves at once.
Step 13

Measure the neck in centimeters. Multiply this value by 2 and subtract 3-5 cm, depending on how well your knitwear stretches and how wide you want to make the collar. If you want a more voluminous collar, 3-5 cm can not be subtracted.
Sew the collar to the neck. We sew, pulling the knitwear a little.
Step 18
It remains to process the bottom of the sweater and sleeves. If you are sewing on an overlocker, finish the edge, tuck it 1 time and sew on the hem. If sewing by machine, double-fold the edge and sew.
More details in the video: