Original crafts for school with their own hands. Original crafts for school. Crafts from handy materials
All parents with children in elementary school have to do with them DIY crafts for school. You can get annoyed at this, so you have to spend your free time, which is always not enough, but you can treat it with joy - after all, this is a wonderful occasion to talk with children once again, escape from everyday life and get creative. Nothing brings people together like working together, especially when doing something requires creative thinking. Topics, techniques and materials can be very different. Usually, themed crafts are made for all holidays. Behind New Year when we were engaged in gifts for relatives and friends, Christmas toys and decorations. Ahead - Defender of the Fatherland Day, March 8, Easter. Let's think in advance what we can do together with the children.
Of course, the first thing that comes to mind is postcards. The technique of making postcards is different, but most often it is an application. Irisfolding is also popular, also a kind of application, but the cards made in this technique have great expressiveness and volume. Children can do this kind of work with minimal help from you.
The main thing is accuracy. Although even the most ordinary application is good if you take material with a different texture or pattern. The volume of the finished product will be created by thickened double-sided tape. Origami, quilling will also make your crafts more interesting and expressive. Feel free to combine different techniques in one product. For example - a postcard in the form of a men's shirt - the topic is not new, but it is painfully good. A vivid example of how expressiveness is achieved by small means. Postcards with fig. 2 made even easier. The pocket is glued only along the lower contour, the congratulation is written on a separate card and inserted into the pocket. An origami airplane can serve as a postcard. On his wings you can write congratulations.

Postcards for March 8 are made using the application technique. In Fig. 5, some of the flowers are made using the technique. A very simple but beautiful postcard in Fig.6. Flower petals in the form of circles, cut out of a stencil from colored paper, are glued dotted at the center of the flower.
The stem can be made from an earpick stick or a piece of used ballpoint pen refill. Very decorates a simple picture with a ribbon bow. On the flag you can write a short congratulation: “Congratulations!” or "Since March 8!".
If you have a printer, print out the text or write it by hand. For flowers from the postcard in Fig. 7, you need to make a petal stencil. Cut out the petals from colored paper and go over the edges with a dry piece of foam rubber, only slightly dipping it into the paint.
The paint should be in tone, but darker than the flowers themselves. Only the bases of the stems are glued together with a congratulatory card. Colored ribbon bow. On fig. 8 butterflies are made in the technique of three-dimensional appliqué. The body is made of sequins.
A spiral pattern can be applied with a felt-tip pen in short strokes. On postcards for Easter, flowers, eggs, chickens are usually depicted. It is not necessary to stick an application. You can make a two-layer postcard with a cutout at the top, and place a piece of fabric or patterned paper under the cutout.

Now it will be easier for you to DIY crafts to school, photo finished work will help in this. It is not necessary to copy, it is enough to understand the manufacturing principle and make something of your own. In the same technique that postcards are made, you can make a wall panel. But in this case, you will need to take care of the frame so that the work looks complete. A ready-made wooden frame will do. And if it is not there, make it yourself from thick paper, cardboard, decorating it to your liking. Of course, postcards or panels are far from all that you can do with your own hands. Plasticine, thermoplastic, salt dough are excellent materials for voluminous crafts.
DIY ideas for school

It just so happened that we don’t have a holiday for men like March 8 or Mother’s Day. All these functions are performed on February 23. Therefore, on this day, they congratulate both adult men who served and are serving in the army, and boys - future defenders of the Fatherland.
Girls can congratulate not only their dads and grandfathers, but also classmates. For them, both postcards and small ones will be appropriate as a gift. Gifts for dad or grandfather can be not only military topics. Play the profession or hobby of the person to whom the gift is intended. Look at the interesting work made of plasticine or thermoplastic in Fig. 13, which is a three-dimensional application. In this technique, you can make small panels on cardboard, plywood or a piece of thin plastic.
Figures 14-16 are just right for such work. Of these, if the size allows, you will get nice magnets. In the same technique, you can make holiday medals. Figures 16-20 are suitable for Easter work. They can also be made as a paper application. On March 8, flowers made using a wide variety of techniques are appropriate.

Home decoration has become popular - a wreath, which is traditionally made for Christmas. But the idea is so good that a wreath can be made for Valentine's Day, and for March 8, and for Easter. Just choose the appropriate attributes for each of the holidays. Flowers are suitable for any of these holidays. For Valentine's Day, you can add hearts.
You can decorate the whole wreath with hearts alone, just make them of different sizes and several shades of red or pink. For Easter, you can add eggs, chicken or rabbit figurines to the flowers. The simplest basis for a wreath is a circle made of thick cardboard.
Volumetricity can be given by laying foam rubber or synthetic winterizer on cardboard, wrapping it with ordinary or construction tape. On fig. 21-22 the base of newspaper tubes is wrapped with toilet paper, then everything can be fixed on top with double-sided tape. A decorative layer is applied to the adhesive tape, which in this case will lie more densely.

On fig. 23 shows the base for a heart-shaped wreath. A corrugated pipe is put on a cardboard heart. The edges of the pipe must be cut obliquely and fastened with glue, thread or wire. In Fig. 24, the cardboard circle is given volume by wrapping it with crumpled paper and threads. Of course, the base of rolled rods is very appropriate for spring wreaths, but not everyone has the opportunity to make it. For Easter, thin twigs of willow with "seals" are suitable. Fresh branches need to be bent into a ring and tied. At room temperature, they dry fairly quickly and retain their shape. If you have a piece of thick hose, you can roll it into a circle and connect it to a cardboard cylinder that is inserted inside both ends (another option is a cork or a piece of tube of a suitable diameter). You can connect with glue and tighten with wire for reliability. You can decorate it with colored threads, a satin ribbon or a strip of fabric, burlap (Fig. 25, 27).

A very interesting option is to glue the base with peas, as in fig. 26. Colored semolina or rice will also work. Moreover, it is better if you mix grains of different shades. Groats are poured into a bowl with a diameter larger than the diameter of the wreath. The base is smeared with glue with a brush and lowered into a container. Spread the powder evenly with your hands. Stick everything you see fit on the finished base: flowers, hearts, eggs, etc. Flowers can be made from a variety of materials: paper, fabric, felt, napkins. Eggs can be taken quail or chicken. It is necessary to pour the contents by making two punctures at opposite ends. You can paint them with acrylic paint or decorate in another way. On March 8, you can make a wreath in the shape of a figure eight and decorate your house or class with it. Children with your help can easily make DIY crafts for school, ideas which have been presented here.

The simplest and most affordable material that can be used in the manufacture of various works is paper and cardboard. Sometimes you don't even need to buy them. Indeed, in any home you can find packing boxes, cardboard liners, cylinders from used toilet paper or paper towels, old magazines and newspapers, egg trays. If you add plastic bottles to this, then an immense scope for creativity opens up. Usually, do-it-yourself paper crafts for school are most often represented by appliqué. Even an ordinary application looks more attractive in the iris folding technique (Fig. 41-44). Pick up a drawing for your child, print it out, and if there is no printer, you can simply redraw it by attaching a sheet of paper to the monitor screen. It remains to pick up colored paper and cut strips. This technique is quite simple and requires only accuracy. The result is wonderful. You can make flowers out of paper.

Look what a beautiful sakura branch turned out from napkins (Fig. 33-36). The child will be happy to cut flowers. The basis of the craft is an ordinary branch that can be cut in a garden, forest or park. If you are not satisfied appearance bark - paint it with acrylic paint, but this is not necessary at all. Flowers from 2-3 layers are glued with a gun or ordinary glue. The main thing is that it should not be too liquid, so that the napkin does not blur from it. Roses and carnations are made from napkins. If you make the stems of wire, which you can also wrap with a green napkin or stick around with plasticine, you will get a wonderful bouquet.

DIY crafts to school from cardboard can be very varied. These are, first of all, toys and panels made in various techniques. It would be so nice to decorate the walls of the nursery, and not only with the works of our children. But sometimes there is some incompleteness. It will help to make the work more attractive and complete (Fig. 37-40).
In the simplest case, it can be made of thick cardboard, pasted over with paper or painted to match. But frames decorated with grains, cereals, shells or even buttons look much more attractive. All this is glued onto a cardboard base. Various pasta products are great, then it is good to paint such a frame with spray paint in the desired color. Old magazines will also be used. Rolled up with a thin knitting needle, tubes from magazine sheets are good without coloring, but if desired, they can also be painted. Cardboard can be wrapped with colored threads, decorated with appliqué in the same style in which the main work was done.
Corrugated cardboard itself is a very interesting material. An example of this is the frame in Fig. 40. Narrow strips are cut from packaging material for refrigerators and televisions. Placed on edge so that the texture of the material is visible, they do not even require staining. The frame is enlivened by additional decorative elements - butterflies and flowers, a bright appliqué, which look very fresh on a brownish cardboard background. Frames are a great gift. You can insert photos or works made by children into them. The main thing is that the frame is in harmony with the craft and serves as a background, and does not distract attention from it.

Easter cockerel in fig. 45 is made from paper, cardboard and egg trays. A container can be made by pasting an inflated balloon with toilet paper or newspapers soaked in PVA glue or ordinary starch paste. Pieces of paper or newspapers need to be glued in several layers until you achieve the desired thickness. Just do not forget to lubricate the ball before work with any fat cream. When the paper dries, the air is released from the balloon. The dried product is cut in half lengthwise using a breadboard knife.

Next, make petals from egg trays. The technique is similar to making flowers. They make a head, paws. For paws, you will need an outlet for each. The head starts with one rosette, 4 rows in total. In each next row, the number of petals increases. For wings, glue the petals in rows on cardboard in the shape of a wing. The beak is folded from cardboard in the form of a cone, the comb and tail feathers are cut out. Finished work painted with acrylic paint. It remains to fill the original vase with Easter eggs.
School years are the most unforgettable! School gives us knowledge, teaches us to communicate with people around us, at school we make our first friends, sometimes they remain our friends for life. In a word, the school gives a person a start in life.
What can a student give to a school? There are many different reasons to give a gift to a school. Anniversary of the school, graduation, the first of September, teacher's day ...
The best gift is a handmade gift. But you need to make such gifts so that you are not ashamed to give. We offer you some DIY gift ideas for school.
Giving Memories
What do we have left when we finish school? That's right, good memories. So why not give the school, its students and teachers memories.
The most important thing is the correct presentation of the material, so memories must be chosen wisely. It is important to choose interesting moments from school life.
Give the school a handmade photo album for the anniversary.
Every day something interesting happens at school, and over time, a lot of bright and memorable moments accumulate, which I would like to keep not only in memory, but also documented. You can make an album for the school with commemorative inscriptions. 
A more painstaking gift would be a video.
If you choose the right video excerpts and mount it, you can get a very good mini video about spending time at school.
And if the video is placed in in social networks, users will be able to appreciate how interesting and useful life is at your school. 
Art as a gift
If you have any skill, you can try to make something beautiful and worthy of the attention of a large audience.
If you decide to make such a gift with your own hands, try to allocate enough time for this, because there is no need to hurry in this matter. Everything must be done very carefully and efficiently. 
School interior decoration. There are many ideas for decorating school walls.
It can be a beautiful panel made of natural materials, a quilling painting, a funny polymer clay figurine, a huge red wire heart that demonstrates your love for school.
You can make an interesting decoration of flower pots using decoupage technique for recreation. Such a handmade gift can be presented to the headmaster on Teacher's Day, at graduation. 
Painting. If you have a talent for painting, give the school a handmade gift of your own painting. If such talents are not available, you can make an interesting photo collage.
DIY school crafts
To decorate the school, you can make beautiful crafts for the school with your own hands. Middle school students can make a panel of pencils or felt-tip pens. This panel corresponds to the school theme and it is not difficult to make!
They say that the school is a second home for a person, then we can assume that it will become a kind of family tree. This is a beautiful, original and memorable gift to the school, made by hand.
But this is not the whole list of gifts that can be given to the school.
With their own hands, high school students can make an original gift to the school by carrying out minor repairs to certain school premises. This is a wonderful gift, because sometimes it is simply not possible to carry out widespread repairs to the school.
As a gift to the school impressions
Or maybe you have acting, vocal or choreographic talent? If there are such nuggets in your class, why not give the school some interesting event for the holiday?
Naturally, this is not a material gift, but it will bring no less impressions. Enlist the support of the class teacher and at least the head teacher of the school and go ahead.
In such an album, it is desirable to place photographs from the first to the eleventh grades, while creating sections, writing down memorable dates, wishes to your beloved teacher from grateful students.
Such a present will give the teacher a sea of positive and will remain in memory for many years!
A wonderful gift for a teacher - a cup with a personal engraving. This is perhaps the most worthy reward for that great work, which is simply impossible to overestimate!
If you really have a desire to make a good gift, spend your precious time, make an effort and be sure to work with your soul.
Then your gift will become truly unique and unique!
Gifts for students
But how to reciprocate the teacher - that's right, give gifts in return.
The teacher cannot afford to buy a large number of gifts in the store. But this is not a reason to refuse the opportunity to make children happy. 
Primary school students: first graders and fourth grade graduates can be presented with beautiful medals made with their own hands from cardboard and satin ribbon.
A photo folder can become a memorable gift for a high school student. Such a thing can be made with your own hands from decorative cardboard and colored paper. Don't forget to paste an interesting school photo into it!
For students of any age, a photo-cube will become a universal memorable gift.
It is very easy to make such a gift. It is enough to set aside a free evening for this, print the necessary photos on a printer, make the required number of cubes from thick cardboard and paste over them with photographs. Without a doubt, it will turn out very original! 
High school students can be presented with original covers for the main document in the life of every person - a passport.
The guys grow up, and obtaining a passport becomes evidence of this fact. For them, this is a new step in life.
Give them joy by making unusual gifts for them with your own hands in the form of passport covers. Each student can receive a unique and inimitable gift in the form of a cover with an individual design.
Viewed: 1 980
Making various crafts for children with your own hands together with your child is an exciting activity that greatly contributes not only to the development of the child, but also to strengthening your relationship with him. Any child will be very happy if he has the opportunity to do something beautiful with his parents. Therefore, even in the busiest schedule, try to set aside a piece of time to devote it to activities with children. The sections of our article will provide useful recommendations on how to make DIY crafts from various materials, taking into account the age characteristics of children.
DIY paper crafts for children
The most commonly used material for applied art is, of course, paper. Moreover, it is worth paying attention not only to the usual color sets, but also to other types of it: corrugated, velvet, designer. You can create do-it-yourself crafts for children from paper, flat (applications), as well as voluminous, using various techniques. For example, having learned how to fold a flower using the origami technique, form a beautiful bouquet of tulips.


The easiest DIY crafts for beginners
For those who are just starting to teach their child the arts and crafts, we advise you to start with the simplest solutions, making easy crafts for children with your own hands. Perhaps you will like examples of caterpillars made of paper rings, an application of colorful fish, or funny mice on a piece of cheese.


DIY cardboard crafts for children
Cardboard is an easily accessible material that is well cut, bent, painted, it is often used in children's creative works. In addition to a set of cardboard purchased at the store, cardboard boxes, disposable tableware, cereal packaging, egg "honeycombs", and toilet paper sleeves are used. In our photo catalog you will see what kind of cardboard crafts do-it-yourself craftsmen make for children. For example, a stand for pencils, funny animals, boxes.


Craft "house" do it yourself
Cardboard houses are made at will of any size - it all depends on their purpose. Perhaps it will be a large structure with a child's height, a "dwelling" for dolls or a do-it-yourself craft "house" made as a New Year's decoration, gift wrapping. In any case, the manufacturing technology is the same, the differences will be in size and design. We have prepared some sketches on which you can make blanks. If you are making small structures, PVA glue and adhesive tape are enough to hold the parts together. When building a large house, it is better to use a heat gun for reliability. Do-it-yourself New Year's craft "house" is complemented by decor that imitates snow on the roof (cotton wool, foam balls), and gift wrapping must have at least one opening sash, for example, a door, a roof slope.


How to make DIY crafts from fabric
Wonderful do-it-yourself toys are sewn using fabric. Moreover, not only a solid cut, but various shreds, household napkins and even socks. Look at the photo, isn't it, a cute bunny came out of a sock? An older child will do it on his own, and the baby will have to help. Make the necessary cuts and seams, and instruct the child to fill the figure tightly, as well as draw a muzzle.
You can also sew crafts for children with your own hands, which will become not only a decoration, a toy, but also a useful little thing, for example, a large soft ottoman duck, the photo of which is in our catalog, a star pillow.


Children's DIY crafts from felt
Felt is a wonderful comfortable fabric that has a bright palette of colors. It allows you to sew a variety of DIY crafts for children, and then decorate the children's room with them. Household napkins will help replace the fabric (usually they are sold in a set of four colors). Such crafts-toys are sewn with their own hands without the help of a sewing machine, manually.
Children's crafts for the New Year do it yourself
On the eve of the New Year holidays, children's matinees, rooms are decorated everywhere, lush Christmas trees are dressed up. It is quite possible to make a lot of interesting symbolic additions on your own without spending money on purchases. These can be the most original balls for the Christmas tree, garlands, and other decorations that are quite within the power of a child to make.


DIY snowman craft
The snowman is a kind of symbol of winter and, of course, his presence for the New Year's interior will come in handy. The photos of our selection show options for how to make such crafts with your own hands in stages, using foam balls, socks, pompons. A larger figure, decorated with thread, balloons, glue, will suit the kindergarten matinee. Inflate five balloons of different sizes (two of the same size for the handles). Wrap each of them with a thread dipped in glue (PVA is quite suitable). When the blanks are completely dry, the balls need to burst, get it from the inside. Finished balls are fastened together. The do-it-yourself snowman craft is almost ready. It remains to draw eyes (beads, buttons), a mouth from a thread, a nose-carrot (sew from fabric). Traditionally, the head is complemented with a bucket, the neck is decorated with a scarf.


Santa Claus DIY craft
In the New Year's interior, Santa Claus is indispensable. The easiest way is to draw it from thick paper (cardboard). Use a ready-made template, or make a conical shape from a sheet, which you then “dress” using multi-colored paper, shaping your face, beard, and pens. Do-it-yourself similar children's crafts for the New Year are made using fabric (with us you will find examples of patterns), plastic bottles, and other improvised means.


DIY crafts for kindergarten
Various creative works for young children of kindergarten age should be distinguished by simpler techniques and materials. The child is just starting to learn how to make something beautiful on his own, so you need to choose the most simple, but interesting options.


DIY crafts for kindergarten children: applications
The most common way to teach children how to create pictures is through appliqué. Such DIY crafts for kindergarten (photos are presented below) can be designed not only using colored paper, they also take thick fabric, artificial leather, velvet paper, improvised materials (cotton pads, cereals, etc.), natural raw materials (leaves, seeds) . Children of older groups can start voluminous work, for example, make an application in an “aquarium” box with hanging representatives of the water world.


DIY crafts in the garden from natural material
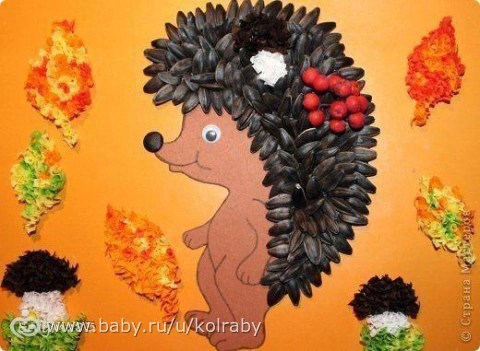
Often, especially in autumn, there are exhibitions of works demonstrating crafts for kindergarten handmade from natural ingredients. Chestnuts, acorns, cones, sunflower seeds, pumpkins, colorful autumn foliage - all this provides great ground for the development of children's imagination. To make various figures, the compositions additionally use plasticine, which fastens the parts or forms the base. Pictures of DIY crafts using natural raw materials are presented by our photo selection. Feel free to try using them by making a chestnut caterpillar, a hedgehog, and other patterns.
DIY crafts for school
Schoolwork varies in complexity. If do-it-yourself crafts in elementary school have simple forms, then high school students who have enough skills are able to arrange more complex compositions, for example, a bouquet of roses from maple leaves, cardboard town or paper basket with asters.
Do-it-yourself crafts for school, the photos of which are posted below, involve the use of a large selection of raw materials, including all sorts of improvised means (plastic utensils, DVDs, matches, buttons).


Do-it-yourself crafts for schoolchildren with trimming technique
Facing is a rather entertaining creative process that is suitable for children of different ages. It allows you to create "fluffy" pictures that will decorate the room, as well as an original gift to relatives. Crafts in elementary school with their own hands have simplified options until the child acquires certain skills. For example, in this way you can only draw the outlines of the picture.
To make a magnificent appliqué, you will need corrugated paper, scissors, glue, a match or a toothpick with a blunt end, a sketch drawing on cardboard. Before making a craft with your own hands, we cut the paper into small squares (0.5 cm), which we sort by color. Lubricate the sketch with glue. We put the match in the center of the square, turn it (so that the corrugation is fixed on it), then glue the end to the sketch. Thus, we draw up the entire drawing, applying the necessary colors of the corrugated squares.


Learning how to create beauty yourself is the best way to develop the creative abilities of a child. Children's crafts with their own hands greatly develop the imagination, giving the joy of an interesting joint pastime with adults.
DIY crafts for children: a selection of 50 ideas with step-by-step examples updated: May 2, 2018 by: Kyiv Irina
share with their findings. All or almost all of us have to do crafts with children for kindergarten or school… You will also find fantasies here for home creativity with kids.
Let's start with trees...


And now pumpkins...


You don't have to do everything according to a specific master class... And strictly adhere to the proposed topic. Can just take a diy idea and remake it in your own way.
Candle fantasies...


Autumn Queen Accessories…


Papier-mâché… And not only…


Well I did not put the owls first again. And so they are always the first and most important with us ...


There are, in addition to owls, and other living creatures…


And again - handy material. Not only the one that was found in the forest ... But also "home" ... For example, pistachio shells...


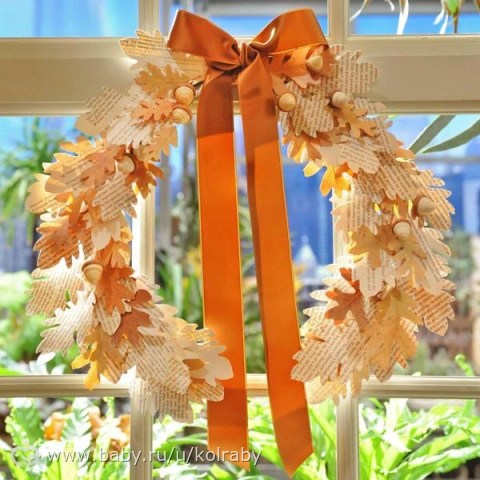
AND door (wall) wreaths… are good not only in the New Year and Christmas… In autumn they especially cozy and bright get...


And again pumpkins... Some have plenty of them in their dachas! I am not a country lover (no-no): my mother just gives me buckets of vegetables. But my godmother gave me a pumpkin last year. Ahhh... Maybe I'm Cinderella?


If you don't understand how cover with leaves or dough bowl from below, to get such beauty, look at the master classes ...


Lots of people make baskets these days. A very popular piece. On this topic "Gifts of Autumn"... Well, the baskets are really very colorful and juicy ...


And again leaves ... And again owls ... And a lot of art ...


In our kindergarten, Alice in the group is very talented, kind and hardworking teachers- Olga Grigorievna and Anna Sergeevna. They love children. And love with them make all sorts of things in the educational process ... Or draw ...


We have crafts for children in kindergarten educators left on a large panel- attached to paper clips that hang on fishing lines ... Now I will find a post in the magazine when we made such a panel (with owls, of course) for crafts ...


Some parents ignore creativity... They say that paints are a lot of dirt and stains - you can only get by with pencils or felt-tip pens ... Yes, and only kala-mala comes out ... And plasticine, they say, the child does not understand - rejects ... Start Small- just give the child the materials. In a couple of sessions ... Then again ... And then start gradually advise and help... To encourage creativity, to creation ... I also don’t really like dolls and LEGO, smeared with plasticine ... But accuracy, diligence and imagination... they won’t be taken from a child from anywhere if you don’t work. Daily.


Of course, there is never enough time. Of course, a lot of work and household chores. But child gets excited that his autumn work is also at an exhibition in a kindergarten or at school. This - pride yourself and your family...
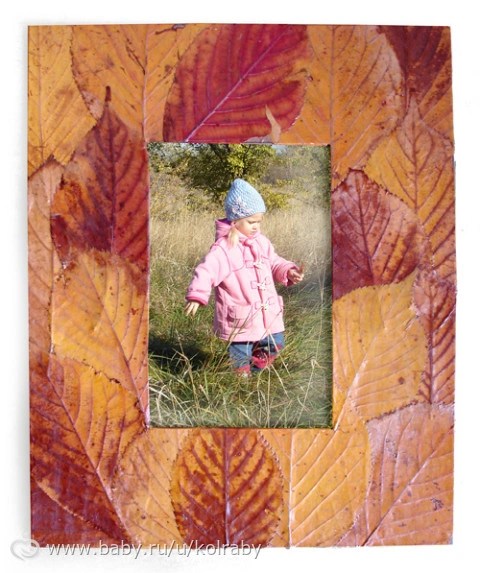


Maybe this year... Maybe next... It is your work that will recognized at the exhibition as the best. Prize money even. It will be a beautiful day. In the meantime, let autumn candles warm family evenings, and photo frames decorated with leaves or acorns flaunt on the shelves ...
By the way, we once with a friend of papier-mâché just giant mushrooms made... All the children made with a palm height ... And we have ... Giants. Mutants ...)))


Who hasn't read my 100 ideas for autumn be sure to read. And apply - partially ...
We a lot of things with Alice and Shura have already been applied and done I'll tell you in other posts...
And I'll show you not today or tomorrow ... roller autumn… And pictures. By last autumn. We have such a beautiful there was a family shoot. It's just complicated for a video combination of video and photo… So I wait until Shura finish installation. As long as he has a lot of work to do.
P.S. Yes, I show you very few personal and family pictures. You will get tired of me otherwise ...


Quick article navigation
In a kindergarten or school, an exhibition of crafts on the theme of winter was announced? Or do you just want to keep your little one busy with creativity on these cold days? In one article, we have collected for you 6 ideas for winter crafts from natural and improvised materials with step-by-step master classes, a selection of 60 photos and videos.
Idea 1. Tabletop diorama with a winter scene
The desktop diorama will allow you and your baby to show all their talents - from modeling to designing. Moreover, using a variety of materials and objects: branches, cones, toys (for example, from Kinder Surprise eggs), plasticine, salt dough, cardboard, cotton wool and much more.
The first step is to come up with the plot of your diorama and plan the composition. You can recreate any of your fantasies or be inspired by our selection of topics with photos and little tips for making crafts.
Topic 1. "Winter in the forest"

The craft is made of polystyrene and plasticine. The bear can also be molded from polymer clay or salt dough.

If in a kindergarten or school you were given the task of making winter crafts from natural materials, then you can use cones. They make excellent Christmas trees, owls, deer, squirrels and hedgehogs for the winter forest. By the way, we just have a few master classes for their manufacture.

Want to make a simple craft more effective? Just light it up with an LED garland! To embed light bulbs in cardboard, you need to make cross-shaped cuts in it.

This winter forest is completely made of felt. Animal figurines can be put on fingers

Topic 2. "Winter house"
A favorite topic at winter craft exhibitions. The house can be surrounded by a forest or a courtyard with paths, a gate, mountain ash, a skating rink and a snowman. And the hut itself can be beautiful not only outside, but also inside.

This video tutorial shows a simple and quick way to make winter crafts from natural materials, namely from twigs and cones.
Topic 3. "Christmas in the village / town"
If you build a couple of houses and connect them with beautiful streets, you will get a whole village or town.

The easiest way to make houses is from paper, more precisely from printed templates that you only need to cut, color and glue. The following video provides a step-by-step master class for making such crafts.
Topic 4. "North Pole and its inhabitants"
Want to make something more original? We offer to make a diorama on the theme of the North Pole.

To make such a craft, download and print the templates (click on the picture to download), transfer them to cardboard, then cut, connect and paint the details


Topic 5. "Winter fun"
Crafts on the theme of winter fun illustrates all the joys of winter. For example, sledding, building snowmen or playing snowballs. To recreate winter scenes, Lego men (pictured below), Kinder Surprise egg figures and any small toys are well suited. You can also make little men with your own hands from plasticine or polymer clay.

Topic 6. Winter sports
Another very original craft idea is a diorama on the theme of skiing, figure skating, hockey, bobsleigh, snowboarding. By the way, the Sochi Olympics can serve as inspiration and a model for modeling.


To make such figures of skiers, download, print, color and cut out the templates (click on the picture to download the templates), then glue a toothpick to the hands of the little men, and a popsicle stick to the legs.


Topic 7. Scenes from fairy tales
Choose your favorite fairy tale and recreate one of its episodes. For example, it can be a fairy tale "12 months", "The Snow Queen", "Frost", "The Nutcracker", "At the command of the pike".

Everything in this craft on the theme of the fairy tale "By the Pike's Command" is molded from plasticine and only the windmill is assembled from matches

To make such a craft, you need to cut several holes in a piece of plywood and insert tree branches into them.

This composition is dedicated to the theme of the ballet "The Nutcracker". The figures in it are made of ... clothespins. Unfortunately, clothespins with a round top are not sold in Russia, but you can order them on the Aliexpress website or use regular ones.
From this video you will learn how to make a winter craft with your own hands based on the fairy tale "At the command of the pike."
Idea 2. Skating rink with a controlled figure
The originality of this winter craft is that the skater can be smoothly “rolled on the ice” by moving the magnet along the back of the box.

What you need:
- A shallow tin for cookies, tea, etc.
- Paper;
- Paints and brushes, pencils or felt-tip pens;
- Paperclip or coin;
- Glue;
- Magnet.
How to do it:
Step 1. Decorate the tin box so that it resembles a skating rink: paint the bottom with white and blue paint and cover with clear varnish (glitter nail polish works well), you can put garlands and flags on top of the box, and snow-covered trees on the sides.
Step 2. Draw a figure of a girl or a boy skating on thick paper or cardboard, then cut it out and glue it to a coin or paperclip.
Step 3 Attach a magnet to the back of the box. Voila, the rink is ready!
Idea 3. A picture painted with prints
Drawing pictures with fingerprints, palms and even feet is a lot of fun, especially for preschoolers. All you need is fantasy, gouache and a sheet of paper! In the next selection of photos you can see examples of such drawings.


Idea 4. Paper mini tree
Another winter craft idea for the little ones is paper Christmas trees. They are made very easily and quickly, and you can use them as you like: as a decoration for the same diorama, appliqué for a New Year's card or panel, to decorate a garland or a Christmas tree.

What you need:
- A sheet of green paper and some brown paper for the trunk;
- Glue stick;
- Scissors;
- Sequins, rhinestones, beads and other decorations for the Christmas tree.
Step 1. From a sheet of green paper, make a square by folding one corner of the sheet, as shown in the photo, and cutting out the excess.

Step 2. Cut one of the short sides of the triangle into equal narrow strips, not reaching the fold of about 1 cm (see photo above).
Step 3. Now straighten your workpiece and begin to alternately glue the ends of the strips to the center fold line, moving from bottom to top.


Step 4. When you fix all the stripes, bend and glue the bottom corner of the Christmas tree up. Further in the same place, but on the reverse side, glue a small rectangle (tree trunk) cut out of brown paper.


Step 5. Decorate the Christmas tree with colorful beads, sequins, buttons and other decorations. If you wish, you can make several of these Christmas trees, glue loops to them, so that you can then assemble a garland or decorate a real Christmas tree with crafts.
Idea 5. Snow globe ... more precisely, a bank
Now we offer to make a real souvenir with your own hands - a variation of a snow globe. True, it will be made from an ordinary glass jar. A child will be able to present a craft to a loved one, present it at a winter crafts competition, or simply leave it on a shelf for beauty.

What you need:
- Glass jar with lid;
- A piece of foam;
- Glue (hot or "Moment");
- Acrylic paint to decorate the lid (optional)
- Artificial snow or just sea salt, sugar, grated white soap or polyethylene foam;
- Figurines that will be placed in a jar;
- Styrofoam balls or any white beads;
- Fishing line;
- Needle.
How to do it:
Step 1. Repaint the cover in the desired color and leave to dry. In this project, spray paint was used to remake the lid.
Step 2. While the paint dries, we will make a “snowfall”. To do this, you need to string several foam balls on a fishing line threaded into a needle. To attach the "snowflakes" to the jar, use adhesive tape.
Step 3. Circle the bottom of the jar directly on the foam, then use a knife to cut out the resulting circle from it. This circle will become the base for the figurines.

Step 4. Glue your figures to the foam circle, then glue the resulting composition to the bottom of the jar.
Step 5. Fill the jar with artificial or homemade snow, close it with a lid with snowflakes and enjoy the view of a winter fairy tale.

Idea 6. New Year's card
New Year's cards are never enough, so we suggest making a few with your child.

What you need:
- Sheet of white paper;
- A sheet of colored paper;
- Scissors;
- Glue stick;
- Markers.
How to do it:
Step 1. Fold a sheet of white accordion paper three times so that each top layer of the accordion is smaller in width than the previous one.
Step 2. Straighten your harmonica, cut the sheet diagonally and slightly in waves as shown in the photo above, then reassemble the harmonica. You have a slope of a snow-capped mountain.
Step 3. Now take a sheet of colored paper, glue the blank on it and cut off the excess. Hooray! The postcard is almost ready.

Step 4. Decorate the mountain with Christmas trees, draw snowmen and skiers, and finally sign the card.


By the same principle, but using larger paper, you can make a winter craft for kindergarten.

